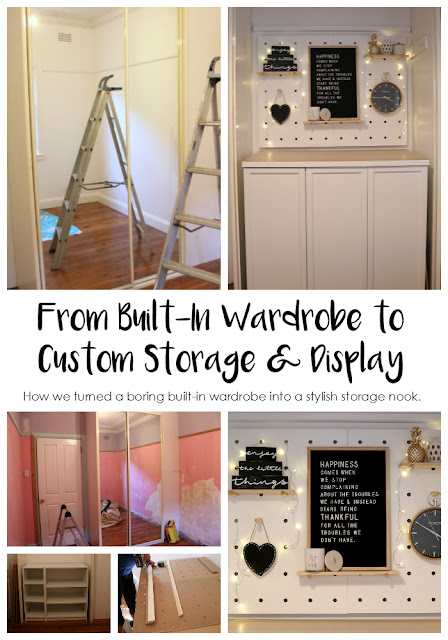
Remember our Spare Bedroom to Home Office Makeover? If so, you'll remember the ugly built in wardrobe that was there.
Well now? That wardrobe is LONG GONE.
It was ugly, impractical (the doors were too big so you couldn't access the middle section) and didn't fit with the look I wanted the room to have.... so I took it out!
Only, I couldn't take it completely out... you see, to the right of that wardrobe was an airconditioning vent - and if I ripped it completely out, I'd also have to patch the ceiling... so let me show you how I came up with a creative solution!
Here's how we did our Built In Wardrobe Makeover on a Budget! >>
Before we started working on the room (and chipping off the paint - don't worry! It wasn't like that before... this was after we'd started sanding and stripping everything back) I thought I'd keep the ugly wardrobe and just put up with it.
You can see in the photos how the doors were too big (notice how instead of meeting in the middle, the one in the front overlaps quite a bit) and that meant the middle section of the wardrobe was completely unusable.
I couldn't find any built in wardrobe makeovers online that I liked the look of (as there was very few that I could actually find) so we decided we'd just paint the room and leave it at that...
Only, once we'd painted the room, I started to hate it even more...
So I took the doors off, deciding I'd use the framework that was there as an open storage system...
Only, once I took the doors off, I hated the framework too... so we took that off as well.
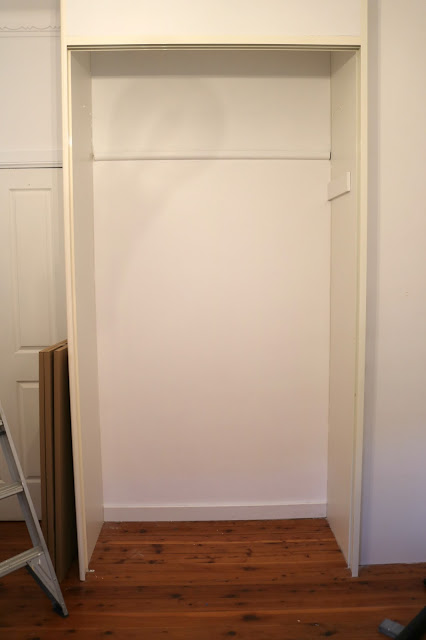
So I was left with the bare bones of the wardrobe. We painted the back (as it was also that bright pink/green/purple combo) and then I had to come up with a solution that would work.
As I mentioned earlier, I couldn't rip the wardrobe out completely - as the top had a hole in the ceiling (an inspection plate) and the right hand side holds an airconditioning duct - so I had to come up with a solution that would give me storage, look nice - but also keep the "bones" of the wardrobe in place...


So I took a trip to IKEA.
The space was just a little over 120cm wide - which posed a bit of a problem.
You see, it was impossible to find cabinets to perfectly fit the space - but also be flexible enough for what I wanted to use them for.
I wanted the space to have three uses -
- Storage for our epic board game collection (if you read Our Ultimate Board Game Guide, yes - we do indeed own all of those board games... and more... thus serious storage was needed)
- Storage for my printer/filing system etc
- The option to use it as a standing desk/extra work space
And I also wanted it to look good!
Whilst I found a few cabinets that would fit - they were either too narrow - or not deep enough to hold all that I needed.... so I decided to come up with my own DIY solution - or an IKEA hack, if you're so inclined!
I have a very clever husband and Dad - so together we worked out a solution.
I bought 4 IKEA Billy Cabinets in total (two double width ones and two single width ones) as well as 3 Billy Doors and an IKEA Linnmon Table Top in White/White Stained Oak.
First, we connected the single width BILLY cabinets side by side with the double width cabinets using cabinet connectors (like this) and then connected both of those sets front to back (so the front of the second cabinet at the back connected to the back of the first cabinet so there wasn't a raw edge showing) using screws and a flat bracket on the top, bottom of the bottom shelf and on the middle of the inside edge.
There was a slight gap between the shelves - but that wasn't going to affect what we needed them for (and if it was an issue, you could always put in a new full depth shelf - or a piece to cover the gap).
Once that was all done, we attached the doors and put the LINNMONN table top on top, securing that with screws through the top of the cabinet into the table top. I used the 120cm width Linnmonn top to cover the top of the shelves and act as a standing desk/extra work space as it fit perfectly over the shelves and doors.
I then called upon the help of my Dad once again as I wanted to hang two Kmart Peg Boards ($29) side by side above the cabinets and table top to act as a decorative storage/display option.
The problem? Those $29 pegboards weren't even....
I first gave them a coat of paint to make sure they were the same colour (as they were a little on the grey side and kind of uneven) and then my Dad decided a french cleat would be the perfect solution to hang them together.
They do have the option to screw them into the wall - but it was going to prove notoriously difficult to have the two match up perfectly when they each had different measurements/tilts etc.
After attaching one part of the french cleat to the two pegboards, Dad and Jesse attached the other part to the wall (and don't worry, it was straight... the angle I was standing at when I took this photo with my phone was not, haha!) and then they just had to carefully slide the pegboards into the cleat to secure it.
And just like that - I was ready to fill the cabinets - and decorate!


Trixie though she'd found a new place to call home - but unfortunately there was no room for puppies as those cupboards needed to be filled!
The left side was to be home for my filing system, current project notebooks and printer (which we'll soon be hacking again as I need the shelf to pull out when I use the printer as I don't want to keep pulling it in/out of the cupboard - stay tuned!) whilst the right hand side is FULL of our board games.
I wasn't kidding when we had a lot...
That's completely full, double stacked (and triple/quadruple stacked in some places) - and we have a spreadsheet with all of the games on it and how many players can play to keep track of them all 🤣
We also added in some bookshelves (the tallest IKEA Billy Bookshelf with extra extensions on top) which I arranged in order of color to hold my "borrowing books" and a few TBR books (as I'm always lending books out to friends).
And then came my favourite part - the decorating!
We need to add some extra light to that space so I added in some fairy lights, an Enjoy the Little Things decor block set (which I made myself using these instructions), a felt letter board and different decor bits and pieces that I found at TK Maxx, Kmart and a bunch of other random stores.
And whilst that gorgeous Innoscent candle is there - don't worry! I don't actually light it up there on the shelf because I don't want the whole place to burn down after all my hard work 😜
I am constantly switching up what's on that shelf as I spend so much time in my office and want to keep it interesting... so I'll have to share more photos on Instagram and the blog as I change it up each week!
But tell me,
Where do you usually shop for furniture?
And have you ever done an IKEA hack?
This post may contain affiliate links.


No comments:
Post a Comment
There is nothing better than reading your comments on our posts! Let us know what you think of this post!