Southern In Law - Australian Lifestyle Blog About Kristy and Jesse - Australian Lifestyle Blog Long Distance Relationship Advice Success Story Healthy Gluten Free Recipe Blog Gluten Free Coeliac Travel Reviews and Recommendations
The Ultimate Board Game Guide  What Should I Read Next The Bookshelf Ultimate Book Recommendation Guide
Want to follow our adventures? Find us on Facebook, Instagram or Pinterest!

Reading on your phone or tablet?
This blog is best viewed on the web version. Simply scroll down
and hit "View Web Version" at the bottom of the page - or click for our web home page
Showing posts with label Southern In-Law D.I.T Projects. Show all posts

Wednesday, March 7, 2018

The Time We Decided to Make a Bookshelf from Scratch

How to Build a Bookcase from Old Fence Pailings or Pallet Wood

If you've been following Southern In Law for a while, you'd probably know that Jesse and I LOVE a good project. 

Whether it's a craft project, a DIY project or a home makeover, we tend to always be doing something. 

Why? Because I'm one of those people that doesn't know how to just relax and do nothing (I relax by doing things) and so I rope my husband into everything I decide to do 🤣

And a few weeks ago, that thing I decided to do was building a bookcase.... from scratch.... as you do. 

So let me share our story of that time we decided to build a bookcase >> 

Thursday, October 22, 2015

DIY: Holiday Decor Blocks

Do It Yourself Holiday Decor Blocks DIY Project

It's no secret that I love special occasions. The decorating, the food, spending time with our family and friends, having time off work and the memories made are just some of the reasons I love when holidays or birthdays roll around.

A few months ago I told Jesse I thought we should have decorations year round to celebrate every kind of occasion. We got to thinking and decided that the best idea would be to create something that could work for a variety of special occasions - and we decided on these blocks!

They are seriously so easy to make and they can be personalised for whatever special occasions you want to celebrate - and they can also be used to display your favourite quotes! 

But enough chitter chatter, 
Let me show you how to make your own DIY Holiday Decor Blocks! >>

Thursday, November 27, 2014

DIY: Christmas Tree Decorating on a Budget PLUS a DIY Christmas Ornament for the Kids!

Christmas Decorating on a Budget plus an Easy DIY Christmas Ornament for Kids - Snowman Handprint Ornament

It really feels like Christmas now! Our Advent Calendar is all set, our Christmas Lights are up we've been baking lots of Healthy Christmas Recipes and we have lots of fun events planned for the coming weeks (and Jesse's brother will be here before we know it!).

But you just can't have a Christmas-y home without a tree - right?! I loveeeeeeee Christmas decorations but Christmas trees have to be my favourite. I'm the one who squeals with delight when Christmas decorations start popping up in shopping centres (even if they do start in October - that's fine by me :P) and the one who begs Jesse to have "picnic dinners" by the Christmas tree - twinkling lights and all. 

I'm also very particular when it comes to Christmas tree decorations. There has to be a theme and it has to match - and pleaaaaaaaaaaaaase do not try and touch my tree with tinsel (tinsel gives me the heebie jeebies!). 

This year, we decided to show you how you can create an incredible tree (and super cute DIY decorations) on a budget - because Christmas shouldn't cost you the earth! Together with our friends at The Reject Shop, we've created a gorgeous Christmas tree for under $100!

In fact, the tree, lights and all of the decorations only cost us: $94.50

Let me show you how we created our tree on a budget - as well as show you our super cute DIY Snowman Ornament! >>

Thursday, November 20, 2014

DIY: Christmas Lights on a Budget!


Do you want to know something about my family?

In our area, we're known as The Christmas Light People. When we first started going to our church, when people asked Jesse or I where we lived they'd simply nod their head and say "Oh, the Christmas Lights House".... yup, that's it!

Every year, for as long as I can remember - we've put Christmas lights up on our house. They've changed over the years but without fail, there's always lights up on our house at Christmas time. 

Last year, for the very first time we almost didn't have them up - and we had so many questions from people in the street! "We're waiting for your Christmas lights!", "When are you putting your Christmas lights up this year?", "You still live in the big yellow house, right? You don't have your Christmas lights up!" "It's not Christmas without your lights".


Work had gotten in the way and we got to mid December and we stilllll didn't have lights up - but one weekend of hard work and they were up - and the cute Christmas thank you cards from kids in our street started turning up in our letterbox. 

This year, we decided to do things differently - we decided to put our Christmas lights up last weekend whilst we had some time off before work gets too busy and we run out of time to put them up! 

But let me tell you more about them! 

Thursday, November 13, 2014

DIY Christmas Advent Calendar! [PLUS Christmas Activity Ideas!]

How to make a DIY Advent Calendar

Christmas is fast approaching and we are getting seriously excited. When I was a kid, this is the time of year when I started begging my Mum for one of those chocolate advent calendars. 

I'd anxiously wait until December 1st and open that little window to reveal my sweet chocolate treat.... But the truth is, by about December 6th I'd realise that the chocolate inside actually wasn't that great and the advent calendar totally wasn't worth all of my anticipation.

That's why we now create our own anticipation-worthy advent calendars!

I wanted to show your how to create your own advent calendar, filled with Christmas activities and delicious treats that will have your family anxiously awaiting each new day - so let me show you 

How to Make your Own Easy to Make DIY Advent Calendar >>

Monday, November 3, 2014

DIY: Turning a Photo Frame into a Custom Chalkboard!

How to make a chalkboard from a photo frame - Custom photo prop DIY/Craft Project Idea

Hey sweet peas! I hope you had the best weekend! We had an awesome weekend - a crafternoon with some of our favourite little guys, Jesse's baptism at our church and then last night we picked up the newest addition to the SIL Family - Trixie Belle! (Which you would have seen if you follow us on Instagram!)

But today, I wanted to share a little sneak peek of our Wedding Anniversary Photoshoot! Once again, the increeeeeeeeeeeeedible Lucie Zeka took some photos for us and we are already in love with what we've seen! (You can see the sneak peek pics on her Facebook Page).

You see, Jesse and I decided that each year on our anniversary we'd have a photoshoot so that we can capture new memories and compare our photos with previous years. We thought this was a wayyy better idea than presents - and it's the perfect way to see how we change and how our family grows over the year! 

At first I thought about using wooden numbers (1, 2, 3 for the years we'd been married) - but then I'd realised I'd be buying an awful lot of numbers - and what I really wanted was a piece (or pieces) that we could use again and again in different photos over the years - for our kids, for special occasions - etc etc. 

So I got to looking - and I found a gorgeous vintage heart photo frame on etsy which I promptly bought and had shipped over and I decided that I wanted to make it into a photo frame. 

How to make a chalkboard from a photo frame - Custom photo prop DIY/Craft Project Idea

Since the process was super simple and the end results turned out awesome - I thought I'd share the process with you so that you can make your own!

Thursday, May 22, 2014

How to Create a Unique Photo Wall For Your Home!


How to create a unique photo wall for your home using canvas prints, art prints, quotes, photo frames, trinkets and more

Photo walls are more of a must have now than they've ever been - and as someone who loveeeeeeeees having photo arounds, I'm quite okay with that!

But there's more you can do with a photo wall than simply hang some frames. A lot of people think they can only hang just photos and frames, but if you ask me, the best photo walls are the ones that show off you and your family's personality. 

Jesse and I currently only have four walls to decorate - which are technically two walls as two walls are taken up by our wardrobe and bay window - so space is limited. 

What I wanted to create was a photo wall that incorporated all the things we love - art pieces, quotes, canvases and our favourite photos. 

How to create a photo collage wall for your home

The centre of our photo wall is a canvas print from PhotoBox - but we didn't want to go with the traditional photo print (because there's so much more you can do with canvas prints!).

As part of my business, I also design printables and art prints for people right around the globe (here's my little design blog and facebook page) - so it's only natural that I'd also want to include a design in our photo wall. 

The print you see above, Home is Wherever We Are Together, was actually created for a client - but it also fits perfectly for us!

Around the print you'll see photos from our wedding, engagement photoshoot, our photoshoot with Chanel, our Verve photoshoot, some nature pictures from Louisiana and Bali and also two of our prints from Christian Designs which we absolutely love!

Step by Step Instructions for Creating a Photo Wall Collage

Monday, July 15, 2013

A DIT Project - A Thrift Store Chair Re-do

A DIT Project - A Thrift Store Chair Makeover

I love when Jesse gets excited about something - especially when it's something we can do together. We discovered early on that we work brilliantly as a team - and we have so much fun whilst we work on a project - so we're always looking for new things to do together. Thus, instead of D.I.Y - we've coined the term D.I.T Project - Do. It. Together.

A while ago, I briefly mentioned to Jesse that I'd always wanted to re-do a piece of old furniture - but I just didn't know if I could do it. Jesse immediately piped up "Of course you can! We can do it together - it's not that hard! We'll google and youtube techniques and it can be our project". 

That night we hit up pinterest for a bit of inspiration, looking at different techniques and such - but that's as far as it got.... until yesterday.


Thrift Store Find - Old Green Chair
I randomly decided on Sunday morning that I wanted to go to the thrift store to see if I could find any treasures. I was expecting to come home with a tea cup or tea pot or maybe even a vase - little did I know we'd come home with a chair. 

Whilst wandering through the store, we spotted a green chair... and it was very horrible green. Katrina so eloquently described it as "baby poo green". 

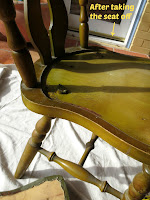
We stood by it, pondering whether or not to pick it up and make this our next project. At the price of just $6 - we decided this was quite a suitable first furniture restoration project - because it wasn't like we were throwing money down the drain.  I made Jesse sit on it in the store to make sure we didn't carefully re-do it only to have someone sit on it and fall through the bottom or have a leg fall off. 

We turned it over, checking we could take the seat off to re-upholster it and we decided we could easily fix the little bit of wobble it had. We continued looking through the story, picking up the chair when we were done to pay for it. "You really want that chair?" the lady at the counter said "yes, thankyou" - she looked at us like we were crazy - and so did everyone else in the store. They were probably imagining these too young people decorating their house with hideously ugly furniture - but we had a plan in our heads.


Old Green Chair - Before SandingOld Green Chair - During Sanding

Old Green Chair - Jesse Sanding Away - Southern In-Law DIY We got home and ate some lunch and then grabbed a drop sheet from the work van, a couple of screw drivers and some sandpaper. The pictures above show you the true yucky green colour that the chair was. 

We sanded and sanded and sanded and sanded - and it took as about 2-3 hours to get all of the green off. 

The top part of the chair was a nightmare to sand as it had so much varnish it took you about 5 minutes of straight sanding in one spot to even get a speck of wood to come through. That was my part and Jesse was wondering why I was huffing and puffing - until he tried his hand at sanding it, put down his sandpaper, took a look at all of the bits I'd done and said "good job baby" and then went back to his easy bits :p


Thrift Store Chair Makeover - Green Chair Before - Furniture RestorationThrift Store Chair Makeover - Green Chair After Sanding

After almost three hours of sanding and vacuuming, we had a fully sanded chair - and the wood underneath surprised us. It was gorgeous - and we couldn't believe that someone would want to stain it green - our only guess was that it must've been stained a different colour and it had changed colour over the years. 

Now we've got to wait until the weekend to work on it some more. On Saturday morning, we're planning on heading to Bunnings Warehouse to buy some soft sandpaper, paint and other bits and pieces to continue turning this ugly chair into something gorgeous! 

At the moment, we're undecided on how we'll paint it. Jesse said it has to be a smooth painted finish - but I'm leaning towards a shabby chic look as I think it would look awesome in cream and a blue undercoat which we can sand back to reveal scratches of. We shall see!

So tell me, do you and your partner work on any projects together - or perhaps you have a hobby that you both love?
What do you love doing together?

Don't worry that Google Reader is closing,  follow Southern In-Law on FacebookTwitterInstagramPinterestBloglovin and Feedly. You can also sign up to Southern In-Law's Weekly Newsletter here.


Related Posts Plugin for WordPress, Blogger...